To capture epic meteor showers, use manual mode with a wide aperture (f/1.4-f/2.8), ISO between 1600-6400, and 10-20 second exposures. Mount your camera on a sturdy tripod and use a wide-angle lens. Pre-focus on a bright star using live view, then switch to manual focus. Shoot continuously with an intervalometer during peak activity and new moon phases for best results. The perfect meteor shot awaits with these technical foundations in place.
Understanding Meteor Activity for Better Shooting Preparation

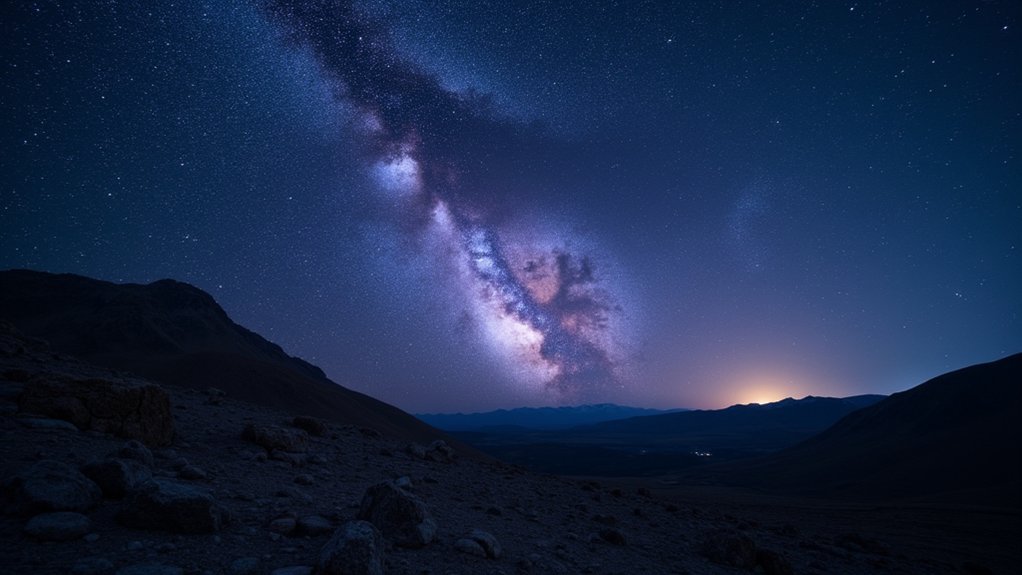
When planning to photograph meteor showers, understanding the celestial mechanics behind these events will dramatically improve your chances of success. Each shower is tied to specific debris trails from comets or asteroids, with predictable peak times—Perseids in mid-August and Geminids in mid-December offer prime photography opportunities.
The moon phase critically affects your meteor photography results. Schedule shoots during new moons for ideal visibility, as full moons wash out fainter meteors despite using high ISO settings and longer shutter speeds.
Shooting during new moons reveals meteors that would otherwise disappear against a moonlit sky.
Knowing the shower’s radiant point helps you frame shots effectively to capture more meteors. For best results, research peak intensity periods when rates reach 50-150 meteors per hour, and choose locations with minimal light pollution.
These preparations will dramatically increase your meteor count per shooting session.
Essential Equipment for Successful Meteor Photography
Although passion drives astrophotography, proper equipment makes the difference between capturing stunning meteor streaks and coming home empty-handed.
You’ll need a high ISO-capable DSLR or mirrorless camera that performs well in low light, with ISO settings between 1600-6400 depending on your camera’s noise handling capabilities.
- A fast wide-angle lens with an aperture of f/2.8 or wider to collect maximum light during night shooting
- A sturdy tripod to eliminate camera shake during long exposures
- An intervalometer (built-in or external) to automate sequential shots, increasing your chances of capturing meteors
- Extra charged batteries, as long exposures in cold night conditions drain power quickly
- Memory cards with sufficient capacity for hundreds of sequential images
Mastering Manual Mode for Night Sky Capture

With the right equipment in your bag, your next challenge lies in mastering the camera settings that will transform the night sky into a canvas of meteor streaks.
Switch to manual exposure mode for complete control over your camera’s critical functions during meteor showers.
Select a wide aperture of at least f/2.8 to gather maximum light from those fleeting celestial moments. Set your shutter speed between 10-20 seconds, applying the 500 rule (divide 500 by your lens focal length) to prevent star trails while still capturing meteor activity.
Adjust your ISO settings between 1600-6400 based on your camera’s noise handling capabilities.
Always shoot in RAW format to preserve detail for post-processing.
When photographing meteors, these manual adjustments will dramatically improve your chances of capturing breathtaking night sky photography worth sharing.
Optimizing Aperture, ISO, and Shutter Speed for Meteors
Successful meteor photography hinges on finding the perfect balance between three critical exposure settings. When shooting meteor showers, open your aperture as wide as possible—at least f/2.8—to maximize light collection and reveal even faint meteor trails against the dark sky.
- Set your ISO between 1600-6400 to increase your camera’s sensitivity to the brief flashes of light meteors produce.
- Adjust shutter speed to 10-20 seconds, depending on your focal length, to capture meteors without creating star trails.
- Apply the 500 rule (500 ÷ focal length) to calculate your maximum shutter speed—with a 24mm lens, that’s about 20 seconds.
- Use a wider aperture (lower f-number) on your f/2.8 lens to gather more light.
- Monitor and adjust exposure settings throughout the night as conditions change.
Focusing Techniques in Near-Total Darkness

Focusing accurately represents one of the most challenging aspects of meteor photography. To overcome this hurdle, pre-focus your lens during twilight when there’s still enough light for your camera to detect contrast.
Switch to live view mode and zoom in on a bright star or planet, carefully adjusting until you achieve maximum sharpness.
Once you’ve nailed the focus, immediately switch to manual focus mode to lock your settings and prevent any accidental adjustments during your shoot.
If your camera offers focus peaking capabilities, enable this feature to verify your focus point’s sharpness in low-light conditions.
Keep a red headlamp handy to adjust settings without compromising your night vision.
This focused approach guarantees your meteor images remain crisp and detailed throughout your entire shooting session.
Continuous Shooting Strategies to Maximize Captures
Since meteors appear unpredictably and last only seconds, employing continuous shooting techniques dramatically improves your capture rate. Set your camera to continuous shooting mode and pair it with an intervalometer to automate the process, freeing you to enjoy the meteor shower while your camera works.
Aim to collect at least 300 images per hour using long exposure settings of 10-15 seconds and the widest aperture your lens allows (f/2.8 or better).
- Always shoot in RAW format for maximum post-processing flexibility
- Use a wide-angle lens to capture more sky area and increase meteor chances
- Set shutter speeds between 10-15 seconds to balance star movement and brightness
- Program your intervalometer for back-to-back exposures without gaps
- Review sample images periodically to confirm shooting stars are registering properly
Balancing Exposure Times With Star Movement

When photographing meteor showers, you’ll need to apply the 500 rule to prevent star trails while still allowing enough exposure time to catch fleeting meteors.
You can extend your exposure time beyond the rule’s recommendation if you’re using a tracking mount, but with fixed tripods, you’ll face significant tradeoffs between ISO and aperture settings.
Finding your best balance means testing different combinations of wide apertures (f/2.8 or wider) and higher ISO values (1600-6400) to maximize light collection without introducing excessive noise to your night sky images.
The 500 Rule
One essential formula every astrophotographer should know is the 500 Rule, which helps you determine the maximum exposure time before stars begin to streak across your image.
Simply divide 500 by your lens’s focal length to calculate your maximum shutter speed in seconds. For example, with a 24mm lens, you shouldn’t exceed 20.8 seconds (500÷24).
When shooting meteor showers, the 500 Rule guarantees your stars remain as sharp points while still gathering enough light to capture meteors streaking across the sky.
- For telephoto lenses (>50mm), consider using 300 or 400 instead of 500
- If using a crop sensor camera, multiply your focal length by the crop factor
- The longer your focal length, the shorter your maximum exposure time
- Use this rule as a starting point, adjusting through trial and error
- Balance exposure time with ISO to avoid excessive noise
Tracking vs. Fixed Mounts
The 500 Rule serves as your foundation for static star photography, but now let’s explore how your mount choice fundamentally affects your meteor shower results.
With fixed mounts, you’re limited to shorter exposures—roughly 500 divided by your focal length in seconds—to prevent star trails while capturing meteor trails.
Tracking mounts transform your capabilities by compensating for Earth’s rotation, allowing exposures of 30+ seconds without blurring the night sky. This extended time dramatically increases your chances of capturing faint meteors.
For ideal results, pair your tracking mount with wide-aperture lenses (f/2.8 or wider) and higher ISO settings (1600-6400).
Before your shooting session, test your setup to find the perfect balance—tracking mounts provide flexibility, but you’ll still need to take into account meteor movement against the star field when composing your final shot.
ISO vs. Aperture Tradeoffs
Three critical settings form the exposure triangle for meteor photography: ISO, aperture, and shutter speed.
When balancing these elements for night photography, you’ll need to make strategic tradeoffs to capture meteors while minimizing star trails.
- Open your aperture as wide as possible (f/2.8 or wider) to maximize light collection for capturing faint meteors.
- Calculate your maximum exposure time using the 500 rule (500 ÷ focal length) to prevent star trailing.
- Increase ISO (1600-6400) to compensate when using shorter exposure times.
- For bright meteors, try 10-15 second exposures with higher ISO settings.
- For dimmer meteors, extend to 20-25 seconds but be mindful of star movement.
The ideal balance between these settings allows you to capture meteors with optimal clarity while keeping the stars as points of light rather than trails.
Memory Card and Battery Management for Extended Sessions

For successful all-night meteor photography, you’ll need high-capacity memory cards (64GB+) with fast write speeds and a system for quick media rotation when cards fill up.
You should pack multiple fully-charged batteries or external power packs, as cold night conditions will drain power much faster than daytime shooting.
Format your cards before heading out and consider using RAW format for better editing flexibility, while maintaining awareness of storage requirements.
Memory Card Management Strategies
Successful meteor shower photography requires meticulous memory card management to avoid missing peak activity moments.
You’ll need high-capacity memory cards (64GB or 128GB) that can store over 1,500 images during a single shooting session. Always format memory cards before each shoot to prevent corruption and enhance available space.
- Keep at least two backup memory cards ready for quick swapping if one fills up or fails.
- Use 64GB or 128GB cards to minimize the need for frequent changes during peak activity.
- Check available space regularly during shooting breaks to avoid unexpected interruptions.
- Format cards before each meteor shower session to guarantee peak performance.
- Pair your memory card strategy with multiple charged batteries or external battery packs for continuous shooting with long exposure times.
Battery Life Optimization
Battery power management deserves equal attention as memory card strategies when photographing meteor showers.
Always make certain your batteries are fully charged before heading out, as long exposure sessions drain power quickly. Pack at least two spare batteries for extended shooting periods.
Implement battery-saving settings by disabling live view and reducing LCD brightness when not actively composing shots. These adjustments greatly extend battery life during the inevitable waiting periods between meteor captures.
For serious astrophotographers, an external battery pack or portable charger provides continuous power without interrupting your session to return to base.
This setup complements your high-capacity memory cards (64GB+) and proper formatting practices, creating a thorough system that keeps you shooting through peak meteor activity without technical interruptions.
Fast Media Rotation
When planning for a marathon meteor shower session, efficient media rotation becomes your lifeline to uninterrupted shooting. To photograph a meteor shower effectively, you’ll need a system that allows your DSLR or mirrorless camera to capture hundreds of images throughout the best time for activity.
- Keep multiple high-capacity memory cards (128GB+) with fast write speeds (UHS-II) ready for quick swaps.
- Format your cards before each outing to maximize storage efficiency and prevent corruption.
- Pack several fully charged batteries and use warmers in cold conditions.
- Consider an external battery pack to extend shooting time with shutter open continuously.
- Develop a rotation routine where you’re preparing fresh media while your camera continues capturing the show.
With proper media management, you’ll maintain maximum uptime during those critical moments when meteor activity peaks.
Adapting Settings for Different Meteor Shower Intensities
Not all meteor showers are created equal, requiring photographers to adjust their camera settings based on the intensity of the celestial event.
For brilliant displays like the Perseids, open your aperture wide (f/1.4-f/2.8) with ISO 3200-6400 to capture light from bright meteors streaking from the radiant.
Moderate showers like the Lyrids call for f/2.8 aperture, ISO 1600-3200, and longer 20-second exposures to compensate for fewer meteors.
For dim Ursids, maintain wide aperture but boost ISO to 6400 with shorter shutter speeds (10-15 seconds) to detect faint trails.
Always consider the meteor shower’s zenith hourly rate when setting exposure time—higher ZHRs allow longer exposures to catch multiple streaks.
During bright moon phases, reduce ISO and adjust shutter speed to prevent overexposure.
Frequently Asked Questions
What Camera Settings Are Best for Meteor Showers?
For meteor showers, you’ll want manual mode with f/2.8 aperture, ISO 1600-6400, and 10-25 second exposures. Don’t forget to shoot in RAW and focus manually on a bright star.
How to Capture a Meteor Shower on a Camera?
To capture a meteor shower, you’ll need a wide-angle lens, manual focus on stars, long exposures (15-30 seconds), high ISO (1600-3200), a sturdy tripod, and patience in a dark location.
What Is the Shutter Speed for Meteor Showers?
For meteor showers, you’ll want a shutter speed between 10-20 seconds. Use the 500 Rule (500÷focal length) to avoid star trails. With a 24mm lens, don’t exceed 20 seconds for sharp meteor captures.
What ISO for Meteor Shower?
For meteor showers, you’ll want to use ISO 1600-6400. Start at ISO 3200 if your camera handles noise well. You can adjust higher for fainter meteors or lower for less noise with foreground elements.
In Summary
Capturing meteor showers is both an art and a science. You’ll need patience as you apply these technical settings, but don’t forget to enjoy the moment. Review your shots between sessions and adjust accordingly. With practice, you’ll develop your own signature style. Remember, even when your camera’s working hard, take time to look up and appreciate the cosmic spectacle unfolding above you.


Leave a Reply