
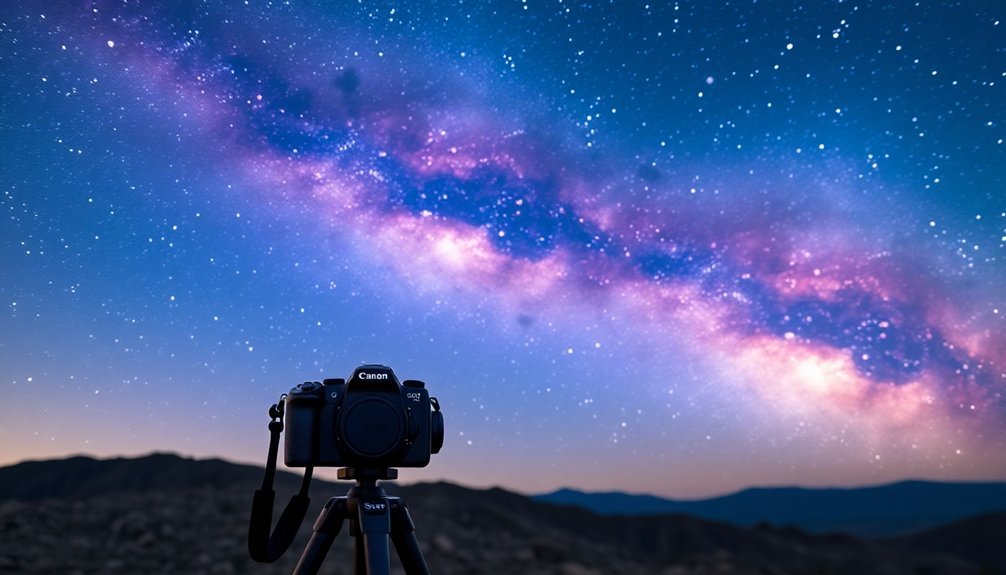
The best beginner DSLR cameras for nebula photography blend affordability with essential features. You'll find excellent value in the Canon EOS Rebel T7 and Nikon D3500, both offering 24MP sensors and reliable battery life. For higher budgets, consider the Nikon D780 or Canon 6D Mark II with their full-frame sensors. The Sony A7 III, Canon T6, and Nikon D3400 round out your top options. Each camera's unique strengths will shape your journey into the cosmos.
Why Choose a DSLR for Nebula Photography

Many astrophotographers choose DSLRs for nebula photography because they offer an ideal balance of versatility, affordability, and image quality.
You'll find that DSLRs don't require an external computer to operate, making them more convenient for field use. They're also cost-effective, with entry-level models starting around $300-$1,000. Quality used models can be found for as little as $250 or less.
What makes DSLRs particularly suitable for nebula photography is their modifiable nature. You can enhance their performance by removing the IR cut filter, making them more sensitive to the hydrogen-alpha wavelength that nebulae emit.
Their large CMOS sensors provide excellent image quality, comparable to some astronomical CCD cameras. When you attach your DSLR to a telescope using a T-ring adapter, you'll be able to capture detailed images of deep-sky objects while maintaining the flexibility to adjust settings on the fly.
Essential Features for Beginner Astrophotography Cameras
When selecting your first astrophotography camera, specific technical features will determine your success in capturing the night sky.
Choosing the right camera with essential technical capabilities is crucial for successful astrophotography and capturing stunning celestial images.
You'll need a camera that offers complete manual control over exposure settings and includes a live view function for precise focusing on distant stars. While specialized cameras like the Canon EOS 60Da are designed for astrophotography, many standard DSLRs can capture impressive nebula shots, especially when paired with the right accessories. Joining photography communities online can provide valuable guidance on selecting and optimizing your camera setup.
- Manual controls for ISO, shutter speed, and focus settings allow precise exposure adjustments
- Live view capability helps you achieve sharp focus on dim celestial objects
- Wide dynamic range captures both bright and dark details in nebulae
- Multi-shot functionality enables image stacking to enhance final quality
- Built-in noise reduction features help minimize unwanted artifacts in long exposures
Top Budget-Friendly DSLR Options Under $800
Today's budget-friendly DSLR market offers several capable cameras under $800 that excel at both regular photography and astrophotography.
The Canon EOS Rebel T7 stands out with its 24MP sensor and reliable battery life, making it ideal for long nebula shooting sessions.
If you're just starting, consider the Nikon D3500, which features an intuitive guide mode and exceptional battery performance. The D3400 offers similar specs at an even lower price point.
For the most budget-conscious photographers, the Canon EOS Rebel T6 delivers solid performance with straightforward controls.
While these cameras don't offer 4K video, they provide the essential manual controls you'll need for nebula photography. A significant advantage of these models is their traditional DSLR handling which many photographers still prefer over mirrorless alternatives.
Each model supports a wide range of affordable lenses, with the Canon EF-S 18-55mm and Nikon AF-P DX NIKKOR 18-55mm being popular starter options.
Mid-Range DSLRs Worth Considering
Looking beyond entry-level models, you'll find exceptional value in mid-range DSLRs like the Nikon D780, which hits a sweet spot with its robust autofocus system and impressive low-light performance.
The Canon 6D Mark II offers full-frame quality at a reasonable price point, featuring advanced live view focusing and a versatile vari-angle touchscreen. While more expensive than entry-level DSLRs, these cameras maintain high image quality that rivals professional equipment.
The Sony A7 III, while technically mirrorless, competes in this space with standout features like in-body stabilization and excellent dynamic range for night photography.
Nikon D780 Sweet Spot
The Nikon D780 strikes an impressive balance between professional features and beginner-friendly accessibility. With its 24.5MP full-frame BSI sensor and impressive ISO range up to 51,200, you'll capture stunning nebula details even in challenging low-light conditions.
The camera's 900-second exposure capability and weather-sealed construction make it ideal for long nights of astrophotography. The exceptional 2,260-shot battery life ensures you can shoot through entire nights without interruption.
- Advanced 273-point hybrid AF system helps you nail focus on celestial objects
- Dual SD card slots protect your long exposure shots from data loss
- Built-in Wi-Fi lets you control the camera remotely during extended sessions
- USB-C charging keeps you powered through overnight shoots
- Silent shooting mode prevents vibrations during critical exposures
At $2,300, the D780 isn't cheap, but its versatility and durability make it a worthwhile investment for serious beginners exploring nebula photography.
Canon 6D Mark II
While the Nikon D780 targets advanced beginners with deep pockets, Canon's 6D Mark II offers a compelling mid-range alternative at around $1,400.
You'll find a 26.2-megapixel full-frame sensor paired with Canon's DIGIC 7 processor, delivering excellent low-light performance with an ISO range of 100-40000. Advanced shooters can even push the sensitivity to 102,400 ISO when capturing extremely dim celestial objects.
For nebula photography, you'll appreciate the camera's 45 all-cross-type AF points that remain sensitive down to EV -3, helping you track faint celestial objects.
The weather-sealed body protects your investment during those long nights under the stars, while the vari-angle touchscreen makes framing and adjusting settings comfortable from any position.
With built-in GPS for location tracking and Wi-Fi for remote control, plus a battery that lasts 1,200 shots, you're well-equipped for extended astrophotography sessions.
Sony A7 III Features
For aspiring photographers seeking professional-grade features, Sony's A7 III stands out with its versatile 24.2MP full-frame sensor and robust BIONZ X processor. The camera excels with its dust-prone sensor, though users should exercise caution in challenging outdoor environments.
You'll appreciate its weather-sealed magnesium alloy body and impressive 693-point autofocus system when shooting in challenging conditions. The camera's 15-stop dynamic range and expandable ISO up to 204,800 make it exceptional for low-light photography.
- Capture up to 10 fps in burst mode with a buffer capacity of 89 raw frames
- Record 4K video using the full sensor width with S-Log3 and HLG options
- Dual SD card slots with UHS-II support for reliable backup
- Extended battery life of 710 shots per charge
- Built-in Wi-Fi, NFC, and Bluetooth for seamless connectivity
Getting Started With Your First Nebula Shoot
To capture your first nebula, you'll need to master basic camera settings like ISO, aperture, and shutter speed while ensuring your DSLR is properly mounted to a stable tripod and star tracker.
Your essential equipment setup should include a T-ring adapter for telescope attachment and a lens with a low focal ratio to maximize light gathering in dark sky conditions. Choosing a focal length between 135-350 mm will give you the right magnification for most nebula targets.
When framing your shot, start with an easily visible target like the Orion Nebula, and take time to achieve precise focus using your camera's live view feature to zero in on bright stars near your subject.
Basic Camera Settings
Before diving into your first nebula shoot, you'll need to configure several critical camera settings.
Switch to Manual (Bulb) mode for precise exposure control and set your camera to shoot in RAW format, which will give you maximum flexibility during post-processing. An intervalometer cable helps automate multiple long exposures without touching your camera.
Using daylight or auto white balance settings typically works well for nebula photography, while manual focusing through live view guarantees sharp images.
- Set ISO between 800-1600 to minimize noise while maintaining sensitivity
- Choose faster apertures (f/2.8 or lower) to capture more light
- Select focal lengths between 135-350mm for ideal nebula framing
- Use exposures between 1-3 minutes with a star tracker
- Monitor your histogram to prevent over/underexposure
Keep in mind that you'll need a star tracker to prevent star trails during these longer exposures.
Essential Equipment Setup
Start with an entry-level DSLR like the Canon Rebel series, which offers excellent value in the $500-$1000 range. You'll need a sturdy tripod and a lens between 135mm to 350mm focal length – the faster the lens, the better your results.
For optimal results in capturing hydrogen-alpha emissions, consider using a modded DSLR camera that will dramatically improve your nebula photography.
A tracking mount is essential for capturing clear nebula images. Consider the Sky-Watcher Star Adventurer or build a DIY barn door tracker to save money.
Don't forget important accessories like a remote shutter release to minimize vibrations and T-ring adapters if you're using a telescope.
While not mandatory for beginners, narrowband filters can enhance your nebula details by isolating specific wavelengths of light.
Focus and Framing Tips
Since achieving perfect focus is essential for nebula photography, mastering the right techniques will make or break your images.
You'll want to use manual focus with your camera's live-view mode, zooming in on bright stars like Sirius or Vega for precise focusing. For the best results, set your camera to manual mode, use an aperture of f/4 or lower, and boost your ISO to 1600 or higher to enhance star visibility during focusing. The Canon Rebel series is particularly well-suited for beginners due to its user-friendly interface and reliable performance.
- Use a Bahtinov mask to create clear diffraction patterns for precise focus
- Frame your target object in the center using your camera's LCD screen
- Select focal lengths between 135-350mm for capturing nebulae effectively
- Consider using nearby star clusters as focusing and framing aids
- Take advantage of wide-angle lenses for expansive nebula scenes
Camera Settings and Accessories for Success
When you're ready to venture into nebula photography, understanding the right camera settings and accessories can make the difference between capturing stunning images and facing frustration.
Start by setting your camera to shoot in RAW format and use manual focus with live view to achieve sharp stars. You'll want to keep your ISO between 100-800 to minimize noise, though you might need higher settings for fainter objects.
Long exposures are essential, so invest in a reliable star tracker and equatorial mount. A dummy battery setup will ensure uninterrupted power during extended imaging sessions.
Don't forget essential accessories like UV/IR filters to enhance nebula visibility and T-mount adapters for telescope connections. You'll also need a red headlamp to preserve night vision and dew heaters to protect your equipment.
Consider bringing hand warmers and a folding stool for comfort during those long exposure sessions.
Common Beginner Mistakes to Avoid

Even with the right equipment and settings, new astrophotographers often stumble into common pitfalls that can derail their imaging sessions.
You'll want to avoid rushing into deep-sky photography without proper planning and practice. Many beginners make critical errors in polar alignment, target selection, and equipment setup that lead to disappointing results. Using camera control software will help automate and streamline your imaging workflow.
Proper research and understanding of your tools before heading out will save you frustration and wasted time under the stars.
- Choose targets appropriate for your equipment and sky conditions – don't attempt galaxies with a basic DSLR setup
- Practice focusing and equipment setup during daylight hours
- Guarantee precise polar alignment before starting any imaging session
- Use dithering between exposures to reduce noise and improve image quality
- Don't skip post-processing steps – proper stacking and noise reduction are essential
Frequently Asked Questions
Can I Photograph Nebulae From Light-Polluted City Areas?
Yes, you can photograph nebulae from cities using light pollution filters and proper techniques. You'll need a DSLR, tracking mount, and patience. While dark skies are better, urban imaging is possible with the right equipment.
How Long Does It Typically Take to Master Basic Nebula Photography?
You'll need about 6-12 months to master basic nebula photography with regular practice. Even in your first few months, you'll see improvement if you're consistently working on camera settings and shooting techniques.
Will Extreme Temperatures Damage My DSLR During Overnight Shooting Sessions?
You'll risk damage if you don't protect your DSLR during overnight shoots. Keep your camera between -10°C and +40°C, use insulated bags, and employ dew heaters to prevent moisture-related issues in extreme temperatures.
Are Mirrorless Cameras Better Than DSLRS for Photographing Nebulae?
You'll find both systems capable, but mirrorless cameras offer some advantages: they're lighter, have no mirror vibration, and are more future-proof. However, DSLRs still provide excellent results with proven reliability for nebula photography.
Should I Modify My Dslr's Sensor Myself or Seek Professional Help?
You shouldn't modify your DSLR's sensor yourself. The risk of damaging your camera is too high. Seek professional help instead – they'll guarantee proper modification and maintain your warranty while delivering ideal results.
In Summary
You're now equipped to start your nebula photography journey! Whether you choose an entry-level Canon Rebel or invest in a mid-range Nikon, remember that patience and practice are key. Focus on mastering your camera's manual settings, invest in essential accessories like a sturdy tripod and remote shutter, and don't get discouraged by early results. Clear skies and dark locations will be your best friends in capturing stunning nebula shots.


Leave a Reply