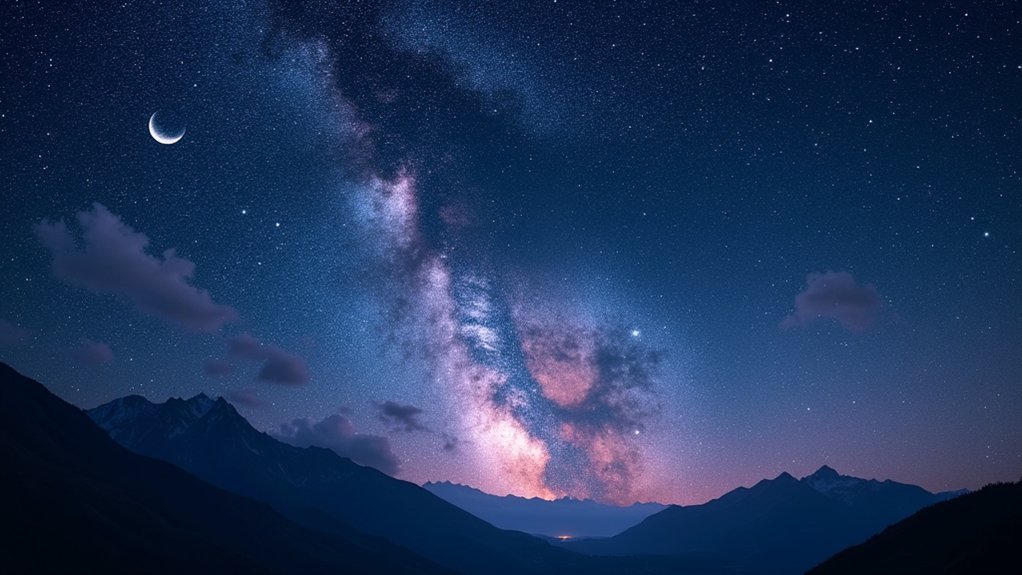
To enhance night sky photos, first process your RAW files in Lightroom, adjusting exposure and white balance (3500-4100K) while monitoring your histogram. Next, apply selective noise reduction to preserve star details while eliminating grain, and use clarity (+40 to +50) and dehaze (+10 to +30) for definition. Finally, fine-tune with precision masking for the Milky Way core and graduated filters to balance foreground elements. These fundamental techniques open the door to truly spectacular astrophotography results.
Understanding Raw Files for Night Sky Photography

While many photographers debate various shooting formats, RAW files remain non-negotiable for serious night sky photography.
When you capture night scenes, you’re dealing with extreme lighting conditions that demand maximum data retention. The RAW format preserves essential information that JPEGs discard, giving you substantial control during post-processing.
With RAW files, you’ll have greater flexibility to adjust exposure, recover shadow details in dark sky areas, and prevent bright stars from blowing out. This expanded dynamic range becomes invaluable when battling light pollution or enhancing the Milky Way’s subtle details.
Software like Adobe Lightroom lets you fine-tune white balance, correct chromatic aberration, and adjust contrast without degrading image quality.
These capabilities guarantee your final night sky photos retain both technical accuracy and artistic vision.
Essential Software Tools for Star Photo Editing
Which applications will truly elevate your night sky photography? Adobe Lightroom and Camera Raw stand as industry standards, offering powerful RAW development capabilities essential for extracting detail from dark exposures. Lightroom’s HSL panel allows you to selectively enhance the colors that make stellar images enchanting.
| Software | Key Features | Best For |
|---|---|---|
| Lightroom | RAW processing, HSL adjustments | Overall editing workflow |
| Camera Raw | Lens correction, Noise Reduction | Initial RAW development |
| Photoshop | Layer masking, Star reduction | Advanced techniques |
Don’t underestimate Lightroom’s Noise Reduction capabilities—they’re vital for preserving star details while minimizing high ISO artifacts. For thorough edits, start in Lightroom for basic adjustments, then move to Photoshop for detailed work like reducing star sizes and applying selective contrast enhancements.
Histogram Analysis and Exposure Adjustments

When examining your night sky photographs, the histogram serves as your navigational chart through the darkness. A well-balanced histogram displays tones across the spectrum without clipping at either end, indicating proper exposure of your celestial scene.
You’ll want midtones centered in your histogram, with stars appearing bright but not blown out. Watch for spikes on the right side—these signal overexposed highlights that can destroy stellar detail.
In your RAW editor, adjust the exposure slider based on histogram feedback. Fine-tune with Highlights and Shadows sliders; reducing highlights recovers detail in brighter areas, while boosting shadows reveals more information in darker regions.
Continue referencing your histogram throughout editing to maintain dynamic range while avoiding noise in shadows or detail loss in highlights.
White Balance Techniques for Natural Star Colors
Setting the right white balance helps you neutralize light pollution’s orange glow while preserving the natural colors of stars and celestial objects.
You’ll need to decide between cooler tones (3500-3800K) that enhance blue nebulae or warmer settings (3900-4100K) that bring out the yellows and reds in star clusters.
When shooting with moonlight present, you’ll want to adjust your white balance slightly cooler to counteract the moon’s warming effect on your night sky images.
Neutralize Light Pollution
Although many night sky photographers struggle with the orange glow of light pollution, you can effectively neutralize these unwanted color casts through proper white balance adjustments.
Start by increasing your temperature to approximately 4200K and shifting the tint to +28 to restore natural star colors.
Avoid Tungsten presets which often create unnatural purple tones. Instead, aim for a balanced mix of blues and yellows that authentically represents the night sky.
Always shoot in RAW format to maintain maximum flexibility when correcting white balance during post-processing.
During editing, temporarily boost both Vibrance and Saturation to 100 to help identify color imbalances. Then reset and fine-tune these values for natural results.
Use the HSL panel for selective adjustments, removing unwanted yellows and greens while enhancing the indigo and purple tones in your Milky Way shots.
Cooler vs. Warmer Tones
The choice between cooler and warmer tones represents one of the most critical artistic decisions in night sky photography. When adjusting white balance, aim for temperatures around 4200K to achieve a natural celestial appearance rather than the artificial purple cast that Tungsten settings often create.
Shooting in RAW gives you flexibility to fine-tune temperature during post-processing without quality loss.
You’ll typically want to balance warmer tones for the Milky Way with cooler tones for the surrounding sky. This delicate adjustment enhances the natural greens and yellows actually present in the night sky.
Don’t be afraid to experiment with your white balance settings—small adjustments can dramatically transform your image while maintaining authenticity.
The goal is to enhance visual impact while preserving the realistic beauty of stars and nebulae.
Balancing Moon Effects
Moonlight introduces unique challenges when capturing stellar objects, requiring specific white balance adjustments to maintain natural star colors.
When editing your lunar-influenced shots, set your temperature between 3500K and 4200K to counteract the cool cast that moonlight often creates. This range helps prevent the noise that appears when processing extreme white balance adjustments.
During Color Grading, push Vibrance and Saturation to 100% temporarily to evaluate color distribution, then dial back to maintain authenticity.
The moon’s brightness can skew your tint—use the slider to eliminate unwanted purple or green shifts that compromise the Milky Way’s natural appearance.
For precision, apply selective color adjustments to specific areas of your night sky, balancing the yellow and blue tones to achieve that perfect celestial palette while preserving star detail.
Noise Reduction Strategies for High ISO Images
When shooting the night sky, you’ll often need to push your ISO settings higher to capture enough light, resulting in unwanted digital noise that can obscure the delicate details of stars and celestial objects.
To combat high ISO noise effectively, use Lightroom or Photoshop to apply moderate luminance noise reduction—this targets graininess while preserving critical star details.
For more precision, consider specialized plugins like Nik Dfine that allow you to selectively reduce noise in different areas of your image.
Always view your edits at 100% zoom to guarantee you’re striking the right balance.
Clarity and Dehaze Adjustments for Stellar Detail

Finding the sweet spot with your Clarity settings can dramatically enhance stellar details while keeping noise at bay.
You’ll achieve the most natural-looking results by applying Dehaze selectively to the Milky Way region, typically starting with values between +10 and +20.
Consider using precise masking techniques to target only the sky portions of your image, preserving foreground elements while maximizing the definition of celestial objects.
Balancing Clarity Settings
To transform ordinary night sky photos into breathtaking celestial portraits, you’ll need to master the art of clarity adjustments. Apply the Clarity slider between +6 to +42 to enhance midtone contrast, making stars pop without appearing artificial. The sweet spot typically falls around +25 for most Milky Way shots.
Complement this with the Dehaze slider at +10 to +30 to cut through atmospheric haze and reveal hidden celestial details. Remember to evaluate these adjustments at 100% zoom—what looks good zoomed out might appear over-processed at actual size.
For maximum refinement, incorporate the Texture slider to enhance fine details in star clusters and nebulosity.
Always balance these tools carefully; your goal is to reveal what’s naturally there, not create an artificial-looking sky.
Stars Without Noise
Achieving stellar definition without amplifying noise presents one of astrophotography’s greatest challenges.
You’ll find Clarity adjustments around +40 to +50 strike an ideal balance, enhancing star definition while maintaining a natural appearance.
Apply Dehaze strategically between +10 and +30 to reveal intricate Milky Way details. When used judiciously, these tools actually help reduce noise in high ISO images rather than exaggerating it.
For best results, utilize Lightroom’s masking tools to isolate the Milky Way core. This targeted approach allows you to apply stronger Clarity and Dehaze adjustments precisely where needed without affecting your landscape elements.
Throughout this process, keep an eye on your histogram levels to maintain balanced exposure while showcasing those brilliant stellar details.
Masking for Precision
While broad adjustments can improve your night sky images, true astrophotography magic happens through precision masking. Using Lightroom’s masking panel, you’ll isolate the Milky Way core for targeted enhancements without affecting surrounding areas.
| Adjustment | Recommended Value | Effect |
|---|---|---|
| Clarity | +42 | Defines stars without over-processing |
| Dehaze | +10 to +13 | Reduces atmospheric haze |
| Brush Tool | Small, soft edge | Targets specific star clusters |
| Feathering | 30-40% | Creates natural shifts |
| Opacity | 75-85% | Controls adjustment intensity |
For ultimate control, use the brush tool to selectively apply these adjustments to specific regions. This technique reveals intricate textures while maintaining the night sky’s natural appearance. You’ll achieve dramatically improved stellar detail without introducing unwanted noise or creating an artificial look.
Local Adjustment Masking for the Milky Way

Since the Milky Way often shares your frame with landscapes or other elements, mastering local adjustment masking is essential for creating stunning night sky photographs.
Lightroom’s masking panel and brush tool allow you to selectively enhance the Milky Way without affecting your foreground.
Selective editing is the key to Milky Way magic, keeping your galactic enhancements separate from earthly elements.
Start by creating a targeted selection of the galactic core, then increase contrast, clarity, and adjust highlights to make the stars pop.
Use the gradient tool to apply exposure and dehaze adjustments that preserve the Milky Way’s intricate structure while maintaining proper foreground illumination.
For even greater control, implement luminosity masks to fine-tune brightness and color.
Don’t forget to adjust your selection’s feathering to guarantee smooth shifts between edited and unedited areas, keeping your enhancements natural-looking while dramatically improving detail and visibility.
Color Saturation and Vibrance Optimization
Color management represents one of the most powerful tools in your night sky editing arsenal.
When enhancing the Milky Way, understand that vibrance selectively boosts muted colors while color saturation intensifies all hues uniformly. For natural-looking results, start with moderate adjustments and fine-tune after denoising.
- Begin with conservative saturation values (+25 to +35) to enrich indigos and purples without creating artificial-looking skies.
- Use vibrance to enhance the Milky Way’s subtle colors without oversaturating brighter stars or foreground elements.
- Leverage Lightroom’s HSL panel for targeted adjustments—boost blues in the sky while reducing unwanted yellows and greens.
Remember that a balanced tetradic color scheme creates visually appealing night photography, so adjust complementary colors to achieve harmony in your final image.
Advanced Contrast Control With Tone Curves

The S-curve technique in Lightroom’s Tone Curve tool creates natural contrast by raising highlights and lowering shadows to make your Milky Way pop against the night sky.
You’ll gain precise control over specific brightness values by making selective tonal adjustments, such as setting Input 188 to Output 180 to preserve highlight details while enhancing star visibility.
These targeted adjustments help balance exposure between the sky and foreground, ensuring your night photography maintains depth without sacrificing natural-looking results.
S-CURVE BASICS
Mastery of tone curves represents one of the most powerful skills in night sky photo editing. When you understand how to create an S-curve, you’ll transform flat images into dramatic celestial landscapes with enhanced contrast and depth.
The S-shape darkens shadows while brightening highlights, making stars pop without losing details in the darkness.
To create an effective S-curve:
- Place anchor points at the lower and upper thirds of your tone curve.
- Drag the lower point downward to deepen shadows and create rich blacks.
- Pull the upper point upward to brighten stars and highlight the Milky Way’s details.
Keep an eye on your histogram while adjusting curve steepness. A dramatic curve adds contrast but may eliminate subtle details, while a gentler S-curve maintains a more natural look.
SELECTIVE TONAL ADJUSTMENTS
Why settle for basic contrast adjustments when you can precisely sculpt every tonal range in your night sky photography? Selective tonal adjustments through tone curves give you surgical control over your image’s brightness and contrast, making the Milky Way pop against darker skies.
| Tonal Range | Input Value | Output Value | Effect |
|---|---|---|---|
| Highlights | 188 | 180 | Subtle darkening |
| Mid-tones | 93 | 75 | Enhanced contrast |
| Shadows | 40 | 35 | Deeper blacks |
| Overall | Varies | Varies | Improved depth |
To apply effectively, set two points on your tone curve—try input 188 to output 180, and 93 to 75. This enhances star visibility while maintaining the night sky’s natural appearance. Remember to revisit your tone curve after other edits to guarantee consistent tonal balance throughout your workflow.
Star Sharpening Without Artificial Artifacts
When capturing the cosmic ballet of stars in night photography, sharpening these distant pinpoints of light requires precision and restraint to maintain their natural appearance.
To enhance your stars without creating unnatural artifacts, follow this focused approach in Photoshop:
Precision in star sharpening preserves celestial authenticity while revealing the delicate brilliance of distant worlds.
- Duplicate your background layer and apply a High Pass filter, adjusting the radius to enhance star visibility while preserving the sky’s natural quality.
- Switch to Overlay blending mode for targeted star sharpening, then reduce opacity if stars appear too intense or unnatural.
- Apply a layer mask with a soft brush to selectively remove sharpening from foreground elements or regions with fewer stars.
Always check your work at 100% zoom to accurately assess the effect and prevent halos or artificial artifacts that detract from your night sky’s authenticity.
Graduated Filters for Balanced Foreground Elements
Two key challenges in night sky photography converge when capturing both terrestrial elements and celestial wonders in a single frame.
Graduated filters in Lightroom offer an elegant solution to this exposure dilemma.
Apply two separate graduated filters—one for the foreground and another for the sky. For your terrestrial elements, increase exposure slightly (around +0.67) while adjusting contrast to reveal landscape details without losing silhouette quality.
For the sky portion, decrease exposure (approximately -0.67) while enhancing highlights and whites to make stars pop against the dark backdrop. This dual-filter approach prevents unnatural shifts between elements.
The beauty of editing in Lightroom is that you can fine-tune each graduated filter independently, creating a balanced composition where both your foreground elements and the Milky Way coexist harmoniously.
Vignetting and Edge Control in Astrophotography
Mastering vignetting and edge control represents one of the most subtle yet impactful aspects of astrophotography editing.
You’ll need to address both natural lens vignetting that darkens corners and intentional vignetting that enhances your composition.
For professional-quality night sky images:
- Remove natural vignetting first using lens correction tools in Lightroom to guarantee even exposure across your frame, particularly important for wide-field Milky Way shots.
- Apply post-crop vignetting strategically to direct viewer attention toward celestial objects in the center while creating subtle darkening around edges.
- Combine with graduated filters to manage shifts between sky and foreground elements, making sure edge control remains consistent throughout the image.
Proper edge control prevents distracting bright corners while thoughtful vignetting creates depth, giving your astrophotography a polished, professional appearance.
Export Settings for Optimal Star Photo Display
The final step in your astrophotography workflow, exporting with ideal settings, can make or break how your celestial masterpieces display across different mediums. To guarantee your night sky photos maintain their stunning detail, use these optimized export settings.
| Setting | Recommendation |
|---|---|
| Resolution | 300+ DPI for high-quality prints |
| Color Space | sRGB for consistent web display |
| JPEG Quality | 80-90% for balanced file size |
| Metadata | Include camera settings, location, date |
| Backup Format | RAW or TIFF for future editing |
Don’t underestimate how these technical choices affect your final image. When preparing for print, the higher resolution guarantees star points remain crisp and defined. For sharing online, the sRGB color space ensures your cosmic colors appear as intended across all devices without unwanted shifts.
Frequently Asked Questions
What Is the 500 Rule in Night Sky Photography?
You use the 500 Rule to calculate maximum exposure time without star trails. Just divide 500 by your lens’s focal length (e.g., 500/24mm = 20.8 seconds) to keep stars as sharp points.
What Is the Best Setting for Night Sky Photography?
For night sky photography, you’ll want to use a wide aperture (f/2.8 or wider), ISO 1600-3200, 20-second exposure time, and 4200K temperature. Don’t forget to mount your camera on a sturdy tripod.
What Is the Best ISO for Night Sky Photography?
For night sky photography, you’ll want to use ISO between 1600-6400. Start at 3200 and adjust based on your camera’s capabilities. Lower ISOs reduce noise while higher settings capture fainter stars and details.
How to Make Night Photos Look Good?
To make night photos look good, shoot in RAW, adjust your histogram for proper exposure, apply lens corrections, set temperature to 3500-4100K for a blue sky, and use graduated filters to enhance details selectively.
In Summary
You’ve now mastered the essentials of night sky photo editing. Remember to shoot in RAW, balance exposure carefully, and apply noise reduction selectively. Don’t overdo your edits—the most compelling astrophotography maintains natural-looking results while revealing hidden celestial details. With practice, you’ll develop your signature style that showcases the night sky’s breathtaking beauty while preserving its authentic character.


Leave a Reply