Star trails shine without expensive gear when you master the fundamentals: use a sturdy tripod, set manual mode with ISO 800-1600, aperture f/2.8-f/5.6, and 20-90 second exposures. Focus manually at infinity and shoot in RAW format. Find dark sky locations using pollution maps or local parks at higher elevations. A basic DSLR with wide-angle lens and remote trigger is sufficient. Free stacking software like Sequator transforms multiple shorter exposures into stunning night compositions. These techniques reveal celestial magic on any budget.
The Fundamentals of Long Exposure Star Photography
Five key elements form the foundation of enchanting star trail photography without expensive gear.
First, master manual mode by balancing ISO settings (800-1600), aperture (f/2.8-f/5.6), and shutter speed (20-90 seconds) to capture clear, bright stars.
Manual mode mastery unlocks the night sky—find the sweet spot between ISO, aperture, and shutter speed to reveal the cosmos.
Second, a sturdy tripod is non-negotiable for eliminating vibrations during your long exposure shots.
Third, proper focusing at infinity is essential—practice during daylight or on distant lights before darkness falls.
Fourth, apply the 500 rule by dividing 500 by your lens focal length to determine maximum exposure time before unwanted star trails appear. A wide-angle lens gives you longer exposure times while maintaining pinpoint stars.
Finally, shoot in RAW format for maximum post-processing flexibility.
Photography without breaking the bank is possible when you understand these fundamental principles.
Finding Dark Sky Locations on a Budget
Now that you’ve mastered the technical fundamentals, your next challenge is finding the perfect dark sky location without emptying your wallet. Light pollution is your enemy, but free resources like the Blue Marble Light Pollution Map can help you identify pristine night sky viewing spots nearby.
| Location Type | Advantages | Cost Factor |
|---|---|---|
| Local parks | Accessible, often permit night access | Free/Low |
| Higher elevation spots | Clearer atmosphere, better visibility | Transportation only |
| Rural areas | Minimal light interference, quiet | Short drive cost |
Don’t overlook astronomy clubs and online communities where fellow enthusiasts share hidden dark sky locations. Planning around moon phases is equally important—new moon periods provide the darkest skies without requiring expensive filters. Even locations just 30-60 minutes from urban centers can offer dramatically improved star visibility.
Essential Gear for Beginners: What You Actually Need

Misconceptions about star trail photography often lead beginners to overspend on unnecessary equipment. The truth is, you don’t need professional-grade gear to capture stunning celestial movements.
Start with a sturdy tripod—this is non-negotiable for preventing camera shake during long exposures. A basic SLR camera like the Canon 650D works perfectly fine when paired with a wide-angle lens that offers a fast aperture between f/2.8 and f/5.6. This combination collects more light, creating clearer trails against the night sky.
Equipment fundamentals: a solid tripod and modest camera with fast wide-angle glass are all you need for compelling star trails.
Add a remote trigger or timer to minimize vibrations when pressing the shutter. Always shoot in RAW format for greater flexibility during post-processing, especially when adjusting exposure and reducing noise.
Using a lower ISO keeps your images cleaner while showcasing the stars’ natural brilliance.
Manual Camera Settings to Maximize Star Trail Clarity
Once you’ve gathered the right basic equipment, mastering your camera’s manual mode becomes the key differentiator between amateur snapshots and breathtaking star trail photography. Your settings create the foundation for capturing those stunning celestial streaks.
Set your ISO between 800-1600 to balance sensitivity with minimal noise. For aperture, choose f/2.8-f/5.6 to maximize light capture while maintaining stellar sharpness. Long exposures of 20-90 seconds create those mesmerizing trails, but remember to adjust based on your focal length to prevent unwanted blurring.
- Switch to manual mode to independently control all exposure elements
- Focus manually on a bright star before beginning your shot
- Match shutter speed to your focal length for ideal trail length
- Experiment with different apertures to find your perfect balance of light and clarity
Composition Techniques for Dramatic Night Sky Images

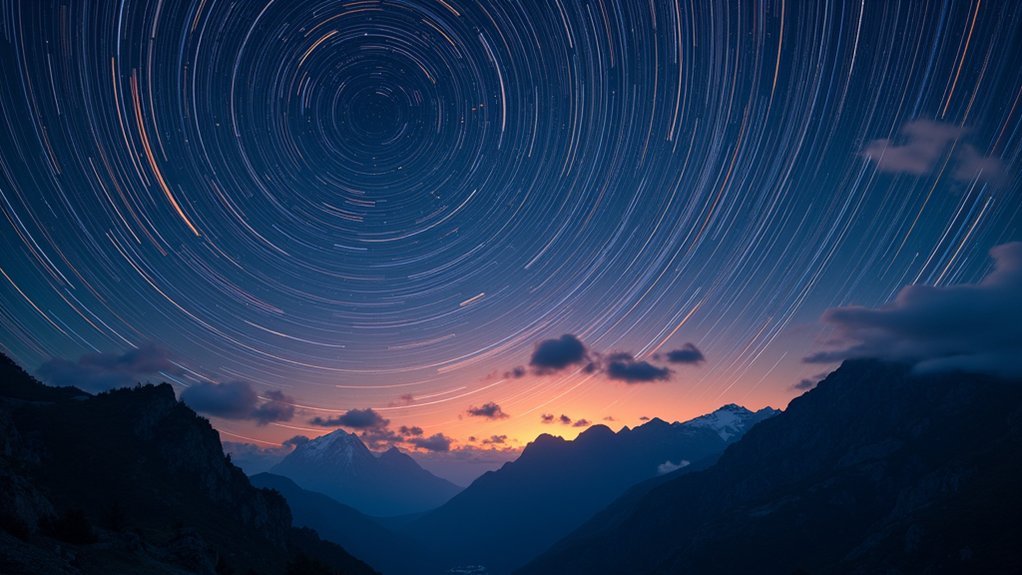
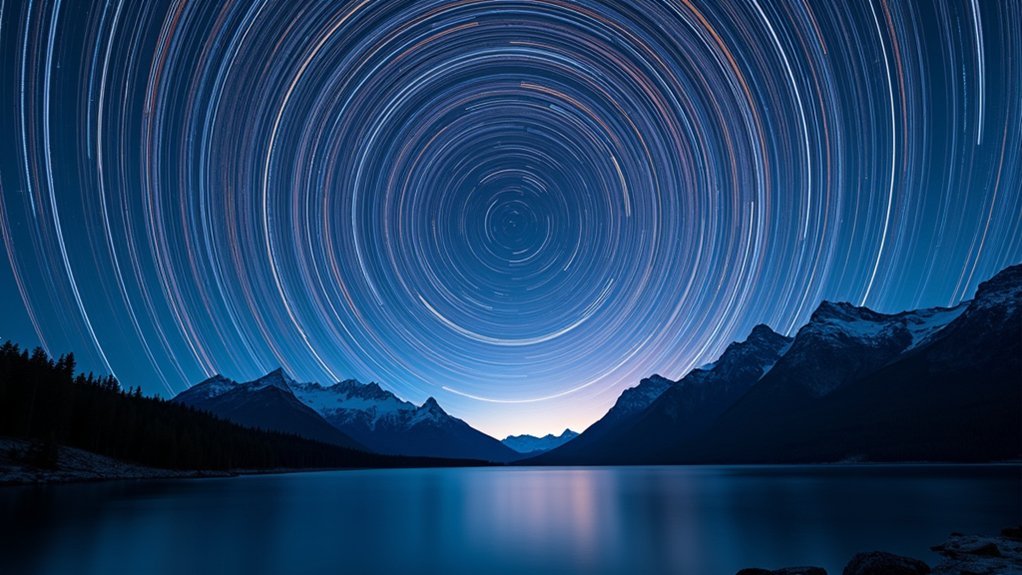
While capturing sharp star trails requires technical precision, creating truly memorable night sky images demands thoughtful composition. Wide-angle lenses are essential for capturing expansive portions of the night sky, allowing more stars and trail patterns in your frame.
Don’t just point upward—incorporate foreground elements like trees or mountains to create depth in your images. The right composition techniques balance sky and ground, enhancing visual interest.
| Technique | Effect |
|---|---|
| Wide-angle lenses | Captures more sky area and trail patterns |
| Foreground silhouettes | Creates depth and visual anchors |
| Directional variety | Produces unique trail patterns based on celestial movement |
| Sky-to-ground ratio | Determines necessary exposure times |
| Golden hour scouting | Guarantees ideal positioning before darkness falls |
Experiment by shooting in different directions—each offers distinctive star movements and trail patterns that transform ordinary landscapes into extraordinary celestial portraits.
Creative Foreground Elements That Enhance Star Trails
You’ll find that silhouetted trees create powerful geometric contrast against circular star trails, turning an ordinary night shot into a compelling visual story.
Light-painted rock formations add dimension and texture to your star trail images, revealing earthly details that complement the celestial movement above.
These foreground elements don’t require fancy gear—just your camera, a flashlight, and an eye for natural frames that guide viewers through your composition.
Silhouetted Trees
Three elements transform an ordinary star trail photo into an enchanting visual story: composition, contrast, and context.
You’ll find that silhouetted trees create dramatic foreground elements that frame star trails perfectly without expensive gear. Position trees in the lower third of your frame to naturally guide viewers’ eyes toward the celestial display above.
- Use a wide-angle lens to capture both expansive night sky and tree silhouettes in one immersive scene.
- Experiment with different tree shapes – tall, slender varieties create vertical lines that complement circular star trails.
- Place trees asymmetrically in your composition to create visual tension and interest.
- Look for distinctive tree forms with character that will stand out against the illuminated night sky.
The stark contrast between dark tree silhouettes and glowing star trails enhances both elements, bringing depth to your composition without breaking the bank.
Light-Painted Rock Formations
Rock formations bathed in strategic light transform ordinary star trail photographs into extraordinary visual narratives without expensive gear investments.
You’ll need just a simple flashlight or LED light source to create stunning illuminated foreground elements during your long exposure shots.
Try using warm-toned lights to complement the natural colors of rock formations while creating pleasant contrast with the cool night sky.
Don’t be afraid to experiment—sweep your light across the rocks in different patterns or intensities.
Remember that timing matters: brief light painting works for shorter star trails, while longer exposures require extended illumination.
The beauty of this technique lies in its simplicity and creative potential.
Your light-painted rocks add depth and storytelling elements that invite viewers to explore both the celestial paths above and the earthly textures below.
Troubleshooting Common Star Trail Photography Challenges

Even with the best preparation, capturing perfect star trails often presents unexpected hurdles that can frustrate beginners and experienced photographers alike.
To capture star trails effectively, remember the 500 rule to calculate ideal exposure time—just divide 500 by your focal length. When shooting in areas with light pollution, consider using a specialized filter to enhance contrast without expensive gear.
- Monitor your histogram carefully to prevent overexposed stars that appear as featureless blobs instead of crisp points of light.
- Use a remote trigger or timer to eliminate camera shake during long exposures.
- Apply a lens hood to block unwanted ambient light that can diminish star trail quality.
- Consider using Noise Reduction features when shooting at high ISO, but be aware this can extend processing time.
Post-Processing Tips for Enhancing Budget Star Trail Images
You’ll transform mediocre star trail photos into stunning night sky masterpieces using free stacking software like Starry Landscape Stacker to combine multiple exposures for cleaner, more dramatic trails.
Experiment with color temperature adjustments to find the perfect white balance that brings out the natural hues of stars without expensive filters.
Apply selective noise reduction to smooth out grainy areas while preserving sharp details in your trails, creating professional-looking results despite budget equipment limitations.
Stacking Software Magic
The magic of digital stacking software transforms ordinary night photography into spectacular star trail images without breaking the bank.
You’ll discover that programs like DeepSkyStacker or Sequator can combine multiple shorter exposures into one impressive composition with considerably reduced noise.
- Capture several 20-30 second exposures instead of one long shot to prevent overexposure while maintaining detail
- Use the 500 Rule to calculate ideal shutter speed based on your lens’s focal length
- Always shoot in RAW format for greater flexibility during post-processing
- Experiment with different stacking techniques to develop your unique artistic style
Color Temperature Tweaks
After mastering the stacking process, your star trail images can truly shine with strategic color temperature adjustments.
Experiment with warmer tones between 4500K-6000K in Lightroom or Photoshop to create a more inviting ambiance that makes your star trails pop against the night sky.
Fine-tune your white balance sliders to enhance vibrancy without investing in expensive gear.
If you notice unwanted color casts, adjust the tint slider to counterbalance green or magenta hues for more natural-looking stars.
Don’t overlook the power of subtle saturation and vibrance increases—they’ll amplify colors without making your image look artificial.
For more dimensional results, apply gradient filters to selectively enhance brightness and color temperature in specific areas of your composition, creating depth that rivals professional astrophotography.
Selective Noise Reduction
While long exposures create stunning star trails, they inevitably produce digital noise that can diminish your final image quality, especially when using budget equipment.
Adobe Lightroom becomes your ally in this battle, allowing you to apply noise reduction selectively to preserve the integrity of your star trail photos.
- Start with luminance noise reduction around 25-30 to smooth out graininess while maintaining star detail and sharpness.
- Use masking techniques to isolate noise reduction to the sky, keeping foreground elements crisp and well-defined.
- Apply minimal color noise reduction to eliminate distracting artifacts that reduce the clarity of star movements.
- Always work with RAW format files during post-processing for maximum flexibility when adjusting settings.
This targeted approach guarantees your budget equipment captures can rival professional results, with clean, noise-free star trails that maintain their natural brilliance.
Frequently Asked Questions
What Is the Best ISO Setting for Star Trail?
For star trail photography, you’ll want to use ISO 800-1600 as your starting point. You can go higher (3200-6400) for shorter exposures in dark locations. Always shoot RAW to manage noise effectively.
What Is the 500 Rule for Star Trails?
The 500 rule helps you avoid star trails by dividing 500 by your lens’s focal length in mm. You’ll get the maximum exposure time in seconds before stars stop appearing as sharp points of light.
Which Observational Device Can Be Used to Create Star Trails?
You can use a DSLR, mirrorless camera, or even point-and-shoot cameras with manual settings for star trails. Just guarantee you have a tripod and intervalometer to capture those long exposures successfully.
What Is the Best Exposure for Star Trails?
For star trails, you’ll get the best results with 20-90 minute exposures. If that’s too long, try stacking multiple 20-30 second shots instead. Don’t forget to use the 500 rule when planning.
In Summary
You don’t need expensive equipment to capture stunning star trails. With the right location, basic gear, and proper techniques, you’ll create breathtaking night sky images that showcase Earth’s rotation. Remember to experiment with composition, include interesting foregrounds, and refine your work with simple post-processing. The magic of star trails is accessible to everyone willing to learn the fundamentals and venture into the darkness.


Leave a Reply