
To capture the Milky Way with a budget setup under $500, use a Canon EOS Rebel T6 with a Rokinon 16mm f/2.0 lens. Set your aperture to f/2.0-3.5, ISO to 3200-6400, and shutter speed following the 500 rule (about 31 seconds for a 16mm lens). Always shoot in RAW and use a sturdy tripod with a remote shutter or timer delay. These fundamental settings will transform your night sky photography with even modest equipment.
What Camera Settings Capture Milky Way Under $500?

When venturing into astrophotography on a budget, you’ll find the combination of a Canon EOS Rebel T6 DSLR paired with a Rokinon 16mm f/2.0 lens offers exceptional value under $500.
For best results, switch to manual mode and set your aperture wide open at f/2.0 to maximize light gathering.
Start with ISO 3200 to capture the faint details of the Milky Way without introducing excessive noise.
ISO 3200 strikes the perfect balance—sensitive enough to reveal celestial details while keeping digital noise at manageable levels.
Apply the Rule of 500 to calculate your maximum shutter speed—about 30 seconds with your focal length lens to prevent star trailing.
Focus manually using Live View, zooming in on a bright star until it’s sharp.
Don’t forget to mount your camera on a sturdy tripod and use a remote shutter release to eliminate vibrations during long exposures, ensuring crisp Milky Way photography.
Essential Camera Equipment for Budget Astrophotography
The foundation of budget astrophotography begins with selecting the right equipment without breaking the bank. You don’t need expensive gear to capture stunning images of the Milky Way—just these essential items:
- Camera – A Canon EOS Rebel T6 under $500 provides the manual controls you’ll need for night photography.
- Lens – Pair your DSLR with a Rokinon 16mm f/2.0 lens to maximize light intake for wide-angle Milky Way shots.
- Tripod – A sturdy tripod is non-negotiable for maintaining stability during long exposure time.
- Remote trigger – Use a remote shutter release to minimize camera shake when shooting with slow shutter speed.
High ISO settings between 3200-12800 will boost sensitivity in dark conditions, though you’ll need to balance this against light pollution interference.
Understanding the 500 Rule for Star Photography

One fundamental principle every budget astrophotographer needs to master is the 500 Rule—a simple calculation that determines the maximum shutter speed you can use before stars begin to streak across your image.
To apply this rule, divide 500 by your lens’s focal length. For example, with a 16mm lens, your maximum exposure time would be 31 seconds (500/16). This prevents star trails while allowing enough light capture when photographing the Milky Way.
If you’re using a crop sensor camera, adjust the formula to 300 divided by focal length to account for the magnification factor. A 20mm lens on a full-frame allows 25 seconds of exposure time, while the same lens on a crop sensor permits only about 15 seconds.
Mastering this rule lets you optimize your long exposure settings for crisp, stunning night sky images.
ISO Settings for Clear Night Sky Shots
Selecting the right ISO setting becomes crucial when photographing the Milky Way with budget equipment, as it directly affects both the brightness of your image and the amount of noise present.
Your camera and lens combination will determine how high you can push ISO while maintaining maximum sharpness in night sky images.
- Start at ISO 3200, which offers good sensitivity while keeping noise manageable on most budget cameras.
- If your full-frame camera handles noise well, experiment with ISO 6400 or even 12800 for brighter details.
- Always shoot in RAW format to preserve flexibility for noise reduction during post-processing.
- Test different settings in your specific shooting location—lower ISO produces cleaner images but requires longer exposures, creating a trade-off you’ll need to balance.
Aperture Selection on Budget Lenses

When shooting the Milky Way with budget lenses, you’ll want to open your aperture as wide as possible—usually between f/3.5 and f/2.0—to capture maximum light during your brief exposures.
Finding your lens’s “sweet spot” might require testing different f-stops, though many photographers find f/2.8 offers a perfect balance between light gathering and edge sharpness with affordable glass.
You’ll achieve prime focus by manually setting your lens to infinity, then slightly adjusting backward while using live view to ascertain stars appear as crisp points rather than blurry smudges.
Wide-Open Sweet Spots
Finding the ideal aperture on budget lenses requires balancing light collection with optical quality. While your budget lens might tempt you to shoot at its widest aperture for Milky Way photos, stopping down slightly often improves image quality dramatically without sacrificing too much light.
- Test your lens at f/1.8, f/2.0, and f/2.8 to determine where sharpness and light collection reach the best balance.
- Use manual focus and tape your focus ring after achieving perfect focus on a bright star.
- Adjust your shutter speed to compensate when stopping down from maximum aperture (longer exposure without creating star trails).
- Compare edge sharpness between apertures, as budget lenses often show significant improvement when stopped down by 1-2 stops.
This sweet spot approach guarantees your sub-$500 setup captures crisp, well-exposed Milky Way shots despite equipment limitations.
F-Stop Light Compromise
Beyond finding the sweet spot, the reality of budget lenses forces photographers to make calculated aperture compromises.
When capturing the Milky Way with a sub-$500 setup, you’ll typically face maximum apertures of f/3.5-5.6, which greatly limit light gathering capability.
Use your lens at its widest f-stop possible for night sky photography—every fraction of light matters.
While professional astrophotographers use f/2.8 or wider lenses, you can compensate by increasing ISO, though be cautious of introducing noise.
Consider investing in an affordable 50mm prime lens with f/1.8 aperture, which dramatically improves light collection compared to kit lenses.
If you must stop down for sharpness, remember this requires longer exposure time, potentially creating star trails instead of pinpoints.
The key is balancing aperture limitations with other settings for the clearest possible Milky Way shots.
Optimal Focus Settings
Despite their price limitations, budget lenses can still capture stunning Milky Way images with proper focus techniques.
When working with affordable glass, understanding aperture settings becomes essential for maximizing lens performance in low-light conditions.
- Set your aperture to its widest setting (f/3.5 on kit lenses or f/2.0 on prime lenses) to gather maximum light from distant stars.
- Switch to manual focus and utilize Live View with 10x magnification to precisely focus on bright stars.
- Test your lens at various apertures to identify its sweet spot – sometimes stopping down slightly reduces optical aberrations.
- Always shoot in RAW format to correct any exposure or focus issues during post-processing.
If your budget allows, consider upgrading to a lens with a lower f-stop (f/2.8 or f/1.8) for greatly improved night sky results.
Manual Focus Techniques for Sharp Stars

When capturing the Milky Way, achieving tack-sharp stars can make or break your image. Switch your lens to manual focus and locate a bright star in the sky.
Enable Live View mode on your camera and use the 10x magnification feature to zoom in on this star, adjusting until it appears as a crisp point of light.
No bright stars visible? Use a distant flashlight as a substitute focus point.
After focusing, always take test shots and review them at 100% magnification to verify sharpness, particularly at the frame edges.
For ideal depth of field, consider using hyperfocal distance focusing, which keeps everything from half that distance to infinity in focus.
This technique maximizes sharpness without requiring extreme ISO or compromising your shutter speed settings.
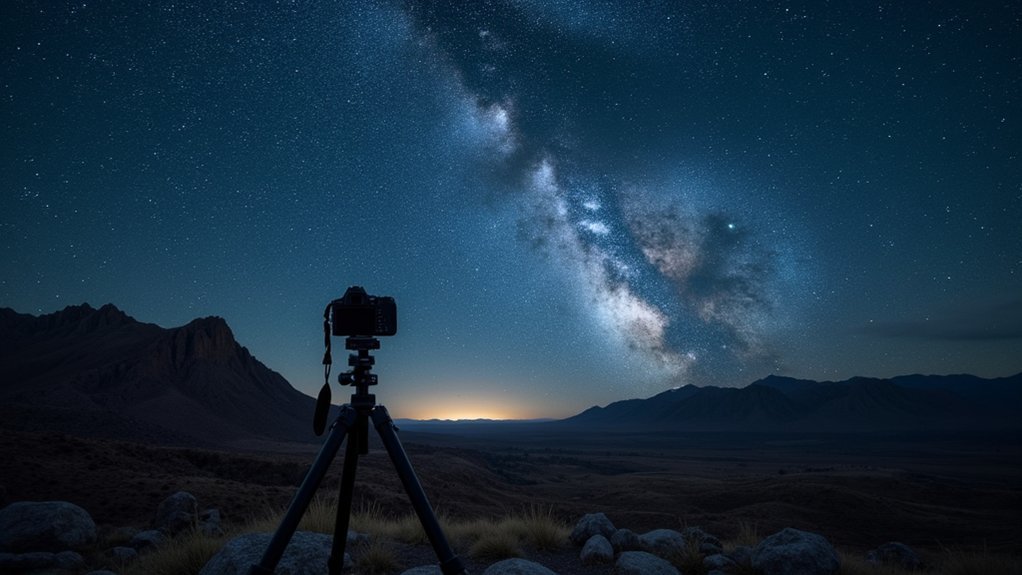
Tripod Setup for Long Exposure Stability
Since the Milky Way requires exposures typically ranging from 15-30 seconds, a solid tripod becomes your most essential accessory after the camera itself.
Your tripod’s stability directly impacts the sharpness of your astrophotography, especially in varied terrain or windy conditions.
For ideal results with your sub-$500 setup:
- Choose a sturdy tripod that supports at least twice your camera and lens weight.
- Look for adjustable leg angles to maintain stability on uneven surfaces where you’ll often shoot.
- Invest in a ball head mount for quick, precise adjustments when aligning with the Milky Way.
- Use a remote shutter release or your camera’s built-in timer to eliminate vibrations during long exposures.
Don’t compromise on tripod quality—even budget cameras can capture stunning night skies when mounted securely.
Using Timer Delays to Eliminate Camera Shake
Although your tripod provides essential stability for Milky Way photography, touching your camera to press the shutter button can introduce subtle vibrations that blur your stars.
To combat this, use your camera’s built-in timer delay function, accessible through the menu system. Setting a delay of 2-10 seconds gives your camera time to stabilize after you press the shutter.
For even better results, consider investing in a remote shutter release, which lets you trigger the camera without physical contact, further minimizing vibrations.
When capturing the Milky Way with long exposure times (15-30 seconds), these techniques become vital to avoid unwanted motion blur.
For extended shooting sessions, try your camera’s intervalometer feature, which automatically takes sequential shots at preset intervals—perfect for consistent results during lengthy astrophotography sessions.
Frequently Asked Questions
What Settings Should I Use for the Milky Way Camera?
Use manual mode with f/2.8 aperture, ISO 3200-6400, and calculate your shutter speed using the 500 rule (500÷focal length). Take test shots to check your exposure and adjust as needed.
What Is the 500 Rule for Astrophotography?
The 500 rule helps you avoid star trails in astrophotography. Simply divide 500 by your lens’s focal length to find your maximum exposure time in seconds. For crop sensors, use 300 instead of 500.
What Is the Best ISO for Milky Way Photography?
For Milky Way photography, you’ll want to use ISO 3200-6400. This range balances light sensitivity with noise control. If you’re using an entry-level camera, stick closer to 3200 to minimize digital noise.
What Is the 500 Rule for Crop Sensor Photography?
The 500 rule for crop sensor photography divides 300 by your lens’s focal length to find maximum exposure time without star trails. With your 16mm lens on a 1.6x crop camera, you’d get about 18 seconds.
In Summary
You don’t need expensive gear to capture the Milky Way’s beauty. With your budget camera, just remember the 500 rule, shoot wide open (f/3.5 or lower), use ISO 1600-3200, and focus manually to infinity. A stable tripod and 2-second timer delay will eliminate blur. Practice these settings on clear, moonless nights, and you’ll soon have stunning galaxy photos that defy your camera’s price tag.


Leave a Reply